
A Few Words of Introduction:
Thank you for believing in me, purchasing the workshop and coming here, it does not go without saying, and is greatly appreciated.
I have worked for years to gain the knowledge and ability to deliver the workshop to you in an optimal way, therefore I ask you to respect my work and investment in this workshop and to understand that the password you receive is personal and should not be shared with anyone else.
In addition, you may not distribute, copy, reproduce, publish, duplicate videos without receiving prior written consent.
Let’s begin:
A baguette is one of the tastiest breads out there when made correctly.
The crackling crust versus the airy texture create an experience, contrast, and texture different from any other bread.
A baguette is at its best within the first three hours of baking it, and I’m excited that very soon you too will feel the difference between a baguette you baked and ate fresh, and a baguette you purchased.
To achieve the perfect baguette I had to practice many times, thousands of times, until I understood the most accurate process and in such a way that it would suit everyone, even under the different conditions that each person has in their home.
I am sure that if you stick to the instructions and practice (a lot) the technique I demonstrate in the video, you will succeed – and quickly.
It is highly recommended to watch the workshop twice from start to finish. Start practicing what you learn. Then return to the workshop and watch it again. Once you try it and then come back to the workshop again afterwards, you will understand other things I said in the workshop differently and better.
There are lots of tips in the workshop. Lots. And on the first viewing you may miss a lot, so please, watch, practice, and then watch again.
The History of the Baguette:
Baguette, in French, is a small stick.
During the 19th century, the Austrians invented a special baking oven based on gas with a steam injection mechanism, which produced heat that reached up to about 200°C. The steam made it possible to create bread with a hard crust and a very soft middle and the oven was an immediate success in France, so apparently the baguette was invented during this period.
The baguette became especially popular from 1920 because at that time a law was created that allowed bakeries to work only from 4 o’clock in the morning. Until that time the common bread was round (Boule) and its preparation and baking time was long.
The bakers were looking for bread that could be prepared quickly and baked in a short time and the baguette met these requirements.
The fact that the baguette tastes the best in the first three hours of it coming out of the oven, led to the French returning to the bakery in the late afternoon to purchase a new baguette and that’s how the baguette became so popular.
A high quality baguette is characterized by:
- A hard crust with a caramel color
- An inside crumb with a creamy color, with scattered air holes that are unequal in size
* The video is dubbed into English
Workshop Program:
Introduction
00:00Ingredients
00:53Preparations
01:47Kneading
04:00The Rising Phase
09:07Pre Shape
12:22Explanation about Baking
15.28Final Shape
16.30Scoring and Baking the Baguette
22.10Shapes for Special Baguettes
26.47Summary
30.33
- Traditional baguette flour T65, “Reine des bles”.
Alternatively, you can work with all purpose flour. At the bottom of this page I have added additional combinations for different and well-known brands, such as Caputo and Pivetti.
Sourdough – For those who don’t have sourdough starter, you can go to the guide I attached in the files. Make a rye sourdough according to the instructions and starting from the seventh day gradually convert the flour to white flour.
- Instant dry yeast. I like to use Bruggeman’s.
- Water
- Salt
- Mixer – I highly recommend working with a mixer since when kneading we will open the dough to the maximum that is possible. Manual kneading is possible, but will be more challenging.
- Thermometer – Highly recommended, but not mandatory. Work according to the volume of the dough. Since the dough is cold, it is likely that you will not exceed 23 degrees, so you will leave the dough out for half an hour after kneading, and then put it in the refrigerator until it increases in volume by 80%.
- A rectangular rising container.
- Bread lame and Razor Blade – If you don’t have one, then the sharpest knife you have. Buy it, it is inexpensive.
- Flour Sifter
- Couche proofing linen– If you don’t have it, use any fabric that does not shed fibers.
- Weight for Small Sizes – Not mandatory.
- Heat Resistant Gloves
- Flipping board– Baguette Board – An important product. If you don’t have one, improvise with a long and narrow dish.
- Steam Kit – if you don’t have one, try to make steam with a spritzer or a dry pan with boiling water poured on it.
- Plastic dough cutter
- Baking Surface – For those who do not have a baking surface such as a stone/steel surface/stainless steel surface, bake on a preheated, inverted oven tray. The downside – the baguette will not get a blast of heat from below.
This section contain affiliate links, which mean that I may receive a commission if you make a purchase using these links at no additional cost to you. As an Amazon associate I earn from qualifying purchases.
Important Points:
- The sourdough starter should be refreshed a little before its peak. Acidic starter will ruin the yeast activity.
- Do not forgot autolysis in the refrigerator. The dough will come out cold and you can knead more securely.
- Learn your mixer and the appropriate kneading speeds.
- Check the dough temperature at the end of kneading. And consider the time period of the dough outside the refrigerator.
- Identify the optimal rising in the container before you start shaping.
- Over-rising will lead to a sticky dough that is difficult to shape, and the texture of the dough will be dense.
- Insufficient rising will be difficult for you to shape, and the baguette will be dense.
- In the division phase, before the first shaping, try to start with a rectangle shape. This will make it easier for you and lead to a correctly spread baguette in terms of thickness.
- In the final shaping stage – pay attention to the thickness of the dough. You want the thickness of the baguette to be uniform, so apply more pressure in the thicker areas.
- Scoring requires skill that comes with practice. Be determined and score through the imaginary parallel lines (watch the video again).
- Lots of steammmm!!! This is very important for baking baguettes.
- Eat hot. Let the baguette rest for fifteen minutes after baking and then indulge yourself. It tastes best when it’s hot.
Tips:
- Mark the height of the dough in the container before putting it in the refrigerator so you can already mark the height from which you want to start working. According to the baguette result, you can understand whether the height you marked is accurate or not.
- When steam is produced for the second round of baking, the stones (to create steam) will no longer be as hot as in the first baking, so I recommend using two sets of stones, and in each round of baking, pour boiling water on the dry stones.
- If you choose to make baguettes without a refrigerator, reduce the amount of water a little because dough that is at room temperature will be more difficult to shape, and experience and extreme control of the technique is required.
- If you feel that the second round of baguettes has over-risen, try to bake on the turbo setting. It will help in this situation.
Questions and Answers of the Course Students:
A thermometer is an important tool for baking in general. I recommend purchasing one. It is inexpensive and will help you later.
Until then, work according to the volume of the dough. Since we put the dough in the refrigerator for autolysis, the dough comes out cold, so it is likely that you will not exceed 23 degrees at the end of the kneading. Therefore leave the dough outside the refrigerator for 30 minutes at the end of the kneading, and then put it in the refrigerator until it has increased in volume by 80%.
- Check that the refrigerator is not too cold (preferably a refrigerator temperature of around 4-6°C).
- It may be that the dough needs more time in the refrigerator, and it will reach the desired rise.
- It is possible that the yeast is no longer good, check it. Put a teaspoon of yeast in a glass with warm water. If after 10 minutes you get foam on the surface of the water, then the yeast is good.
- You can increase the amount of yeast by 0.5 grams.
- After the mixing, you can leave the dough a little longer before putting it in the fridge.
- Keep in mind that a smaller dough(less than a kilo of flour) cools faster, also proofing in a large box (larger surface area), the dough cools faster and a glass or metal box cools faster. Therefore, in such cases, the dough should be left outside the refrigerator for a longer time.
There are several possibilities. The first and fastest is to simply reduce the amount of yeast. The second is to lower the dough temperature (longer autolysis in the refrigerator or lower the refrigerator temperature), or start kneading the dough later so that when you work on the dough it will be at the correct volume.
The flour may not be suitable. Sufficient autolysis may not have been performed, which aids the dough’s flexibility. Also, if you made a fold then you added more strength to the dough, and we don’t want that.
An airy texture is the result of a precise three-fold dough, that is, for maximum development. And the result of working on dough that rose correctly. Note that you move to the shaping stage when the dough has risen about 80%. Dough that rises beyond this will likely end up over-rising which will lead to a denser texture.
Also, in the shaping stage, it is necessary to work gently.
Knead! Knead well, until the dough is smooth and shiny and detaches from the sides easily.
Be careful not to over-rise.
The shine in the dough is due to baking with optimal timing of the dough as well as the right amount of steam. It is a combination of the two. In most cases steam is lacking.
In order to get an ear, you need to have a tight shape and correct timing of baking the baguettes. Pay attention to the press test. When you press the dough you want it to come back slowly. But it must come back. If the dough does not come back, it means it is over-risen and therefore does not have the strength to pull out the ear when baking.
In addition to this, the scoring should be accurate – as parallel to the work surface as possible. And within the two imaginary lines along the baguette.
Experience. A good baguette takes practice. Practice will make you understand the areas where more pressure should be applied and where less.
Yes, for sure. You will have to make slight adjustments to the amount of water and probably the rising times will change.
I strongly recommend achieving a perfect result with white flour designated for baguettes and then experiment with other flours.
Yes. I recommend first achieving the perfect baguette without add-ons. Then try adding whatever you want.
We will add the extras at the end of the kneading and around 10% of the weight of the flour.
And also pay attention to the features of the add-on. You may need to soak it or increase the amount of water in the recipe.
Enter the degrees in Celsius in this calculator and it will convert to Fahrenheit for you.
Files and additional content
I have added for you additional content from my daily work with additional explanations and different variations to the videos.
In addition, in this section you can download the recipe files and a guide for building sourdough starter from scratch.
I have a SUNMIX spiral mixer.
Kneading in a spiral mixer is much easier and faster.
The principles are the same as learned in the workshop.
Start with the main dough (which underwent cold autolysis), add the sourdough and yeast and start at a slow speed of 100-110 RPM for a minute until combined. Then add the salt and a little water and raise the speed to 150 RPM.
At this time, slowly drip the water and add the rest only after the water has been absorbed.
When there is no more water left, increase the speed to 175 RPM for about a minute and a half until the dough is smooth.
Baguette Scoring
A very important part
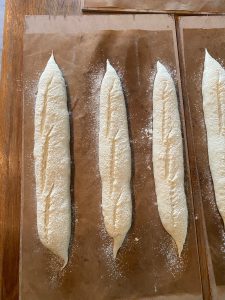
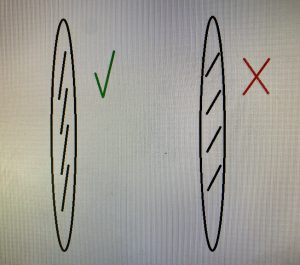
The score is important both in terms of the appearance of the baguette and in terms of the crumb.
A correct score will allow the baguette to open in the right way and will allow the gases to spred openly.
Pay attention to the video for the following:
1) The score angle
2) The depth of the score
3) The overlap between the scores
4) The location of the scores along the baguette
As explained in the workshop, the baguette should be scored along its length with a slight overlap between the score.
I like to accompany the groove with the other hand. It helps me.
Here you can download a guide to build your own sourdough starter from scratch.
Note that the file may be downloaded directly to your downloads folder.
One of the most important steps in baguette baking is to determine when your baguette dough is ready to bake.
The best way to identify this is using the poke test.
Gently press your finger into the dough on the top
If the dough springs back quickly, it’s underproofed.
If it springs back but slowly, it’s properly proofed and ready to bake.
Finally, if it never springs back, the dough is overproofed.
Sometimes the dough will be ready to bake after only 15 minutes and sometimes after 30 minutes.
Follow and learn the dough.
One of the most challenging parts of the final shape is the last closing before rolling out and expanding the dough into a long baguette.
It is important to close only the edges and not to damage the center of the dough, otherwise we will lose the gases.
You have to practice a lot.
In this video I will demonstrate another method, much easier.
which is suitable for beginners / those who have gotten into trouble so far.
Here you can download the recipes that appeared in the workshop.
Note that the file may be downloaded directly to your downloads folder.
How to incorporate baguette preparation into your routine:
Hybrid baguette / Yeast baguette
Preparations:
At 15:00 We will feed the sourdough starter and leave it out in a warm environment.
We will do the autolysis (mixing the flour and water) and put it in the refrigerator.
At around 21:00 the sourdough starter will be ready.
We will start the kneading. We will let it rise as much as necessary depending on the dough temperature and put it in the fridge until morning.
In the morning, the dough will complete the rising. We will shape and bake.
Preparations:
We will feed the sourdough starter the night before in a high ratio. For example, we will leave out 5 grams and feed 75 grams of flour and 75 grams of water, and leave it out in a warm environment.
We will do the autolysis (mixing flour and water) and put it in the refrigerator.
The next morning we will knead. We will let it rise as much as necessary depending on the dough temperature and put it in the fridge until evening.
In the evening, the dough will complete the rising. We will shape and bake.
Sourdough Baguette
Preparations:
In the morning we will do the autolysis and put it in the refrigerator.
We will also feed the sourdough starter.
At noon, the sourdough starter will be ready.
We will knead, let rise to about 50% of the volume of the dough, and put in the fridge until morning.
In the morning, the dough will complete the rising. We will shape and bake.
Preparations:
The night before we will do the autolysis and put it in the refrigerator.
We will also feed the sourdough starter at night in a high ratio. For example, we will leave out 5 grams and feed 75 grams of flour and 75 grams of water, and leave it out in a warm environment.
In the morning, the sourdough starter will be ready.
We will knead. We will let it rise about 60-70% of the volume of the dough and put it in the fridge until evening.
In the evening/night the dough will complete the rising. We will shape and bake.
My baguettes with yours flours


Term dictionary:
Sourdough
This is the component responsible for rising. A sourdough starter is created by combining flour with water.Flour has natural yeast, bacteria and enzymes and when they meet water the magic happens.
Before adding the sourdough starter to the dough, you have to feed the sourdough starter, which basically means adding flour and water to the existing sourdough starter and waiting for it to be ready to work.
Yeast
There are many types of yeast. The best known is baker's yeast - Saccharomyces Cerevisiae.
The role of the yeast is to make the dough rise. The yeast is responsible for creating alcohol and carbon dioxide that makes the bread rise.
Autolysis
After mixing the flour and water wait a period of time ranging from half an hour to three hours. During this time, the flour absorbs the water, and a gluten network begins to form. This period of time is called autolysis.
Eau de Bassinage
A French method in which water is added while kneading. With this method, the amount of water in the dough can be increased more easily. This method allows the baguette to have an airier texture.
Steam
At the beginning of baking, the baguette needs steam so that it can maximize the rising and deepen the color. Professional ovens have a steam injection function.
I use a steam kit that includes a pan and tuff stones, which are preheated before boiling water is poured over them. This creates a lot of steam, which is important for baking the baguette.
Scoring
It is customary to score the baguettes before baking them to allow the bread to maximize its rise. Baguettes have characteristic scoring as you will see in the workshop.
This is the inside of the bread. In a baguette we are looking for a very airy crumb. On the other hand, in wholemeal/rye breads and the like, the crumb will be denser.
Crust
This is the outside of the baguette/bread. A baguette is characterized by a hard and crackling crust.
Bulk Fermentation
The period of time starting from the addition of the sourdough starter to the shaping stage.
This is a very important step in making the bread/baguette. At this stage, the dough is fermenting and rising, and is enriched with flavors.
Final Shape
At the end of the rest phase (bench rest) we will shape the dough into a baguette/bread shape.
We will want to work gently in order to preserve the gases created in the process. In addition, with baguettes it is very important to do good scoring in the final shape so that the baguette can rise in the best way.
Bench Rest
At the end of the first shaping, we let the dough rest in order to allay the gluten for the final shape.
Final Shape
At the end of the rest phase (bench rest) we will shape the dough into a baguette/bread shape.
We will want to work gently in order to preserve the gases created in the process. In addition, with baguettes it is very important to do good scoring in the final shape so that the baguette can rise in the best way.